
Adobe Photoshop is awesome Photo Editing Software. If you are using photoshop then you must ever search for how to Rasterize in Photoshop. In Photoshop you can manipulate the image, you can create awesome graphics, Logo Design, and many more things you can do.
When you’re editing a photo in Photoshop, you have got some issues when you’re using vector images. Because Photoshop work’s better with raster graphics, some tools have problems with vector images like SVG files which are harder to edit.
To rasterize in Photoshop, here is the process.
What is Rasterize in Photoshop?
Rasterize in Photoshop is a process to make vector images into raster images. I will show you two digital images in photoshop for an explanation.
The Raster graphics is a combined pixel, whether its element or image. When we combined pixels then it makes a digital image. The image is stored as a grid of pixels, which is known as raster graphics. The format of the raster graphic is usually JPG or PNG image file.
A vector graphic is a set of mathematical equations which define the position and shape of the image. The format of a vector graphic is usually the SVG format. A vector graphic will not lose any quality while enlarging it. It will remain the same quality in any size.
When you enlarge a raster image, photoshop tries to add some pixels to fill the image, but it causes the image to blocky and pixelated and the quality will degrade.

Both Raster and Vector Graphics Comparison.
Why do You need to Rasterize in Photoshop?
When you resize a vector image it will not lose any quality, then why do we want to rasterize in photoshop with the best quality vector image?
The simple reason is some tools and effects do not work on vector graphics in Photoshop. It works only on raster graphics. If you want to use these tools and effects then you must rasterize in photoshop some filters will not work, and eraser tools, fill tools, and brush tools will not work on vector images.
How to Rasterize in Photoshop
Rasterizing in Photoshop is a simple and easy method, which will be done in a few clicks and your vector image will be converted into a raster image.
1. First, open your Photoshop, then import your images.
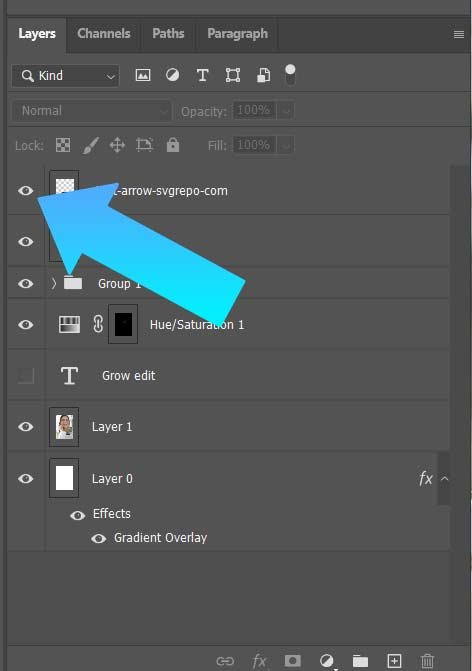
2. Now make sure to click on the Layers panel to make it visible. You can also use the keyboard shortcut F7 to make it visible.

3. Select the vector image layer which you have imported. When you Rasterize in Photoshop, then check if any layer containing a small shape icon in the bottom right corner is vector graphics.

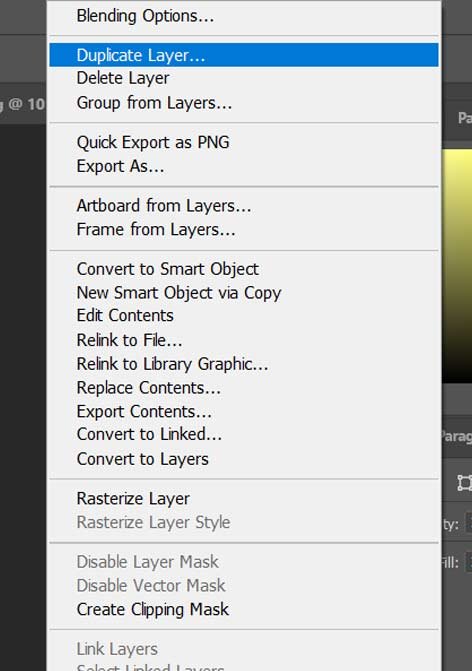
4. Now make sure to Duplicate the vector image to have a backup or you will need it later. Always make a Duplicate Layer by Pressing CTRL + J keyboard shortcut or you can right-click on the layer and select Duplicate Layer.
5. Rename your layer, then click OK.
6. Now you must make one layer invisible, to do that Click on the eye icon on your original layer.
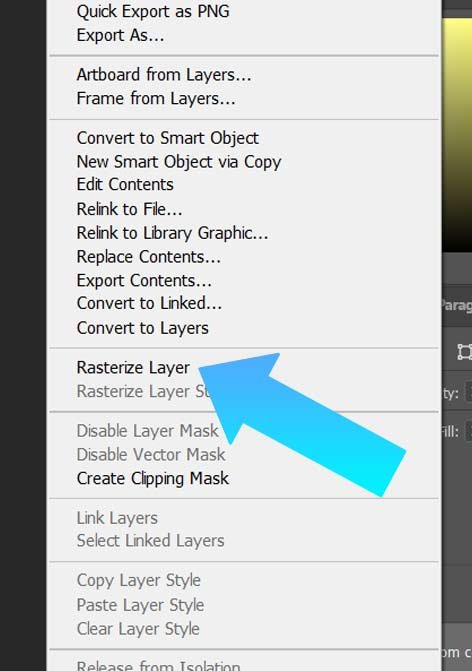
7. To Rasterize in Photoshop, right-click on the layer and click on Rasterize Layer.
How to use Vector images without Rasterizing in Photoshop
Rasterizing images is a simple process, but it may not be the best option sometimes. As we already know when converting vector images to raster images will lose some of their quality. You can convert it back to a vector image, but it will again lose quality. You can avoid raster in the first place.
This is how you can Rasterize in Photoshop 2022. You can also Read our Tutorials on Adobe Photoshop. We have also added Adobe illustrator Tutorials, Adobe After Effects Tutorials, Adobe Premiere Pro Tutorials, and DaVinci Resolve Tutorials.