
Do have a problem with the photo you capture, your teeth’s coming up with a yellow tint. I will show you how to Whiten Teeth in Photoshop step by step guide. Once you learned the technique you can whiten your teeth in a few seconds. With the Teeth whitening subject in photos will look more confident and smarter.
How to Whiten Teeth in Photoshop with Step-by-step Tutorial
1. Open your Photoshop and add your image. I’m using Photoshop 2022 which is the latest version.
To open a file, go to File > Open and select your image in the file browser window, then click Open or you can Drag an image from the windows explorer.
2. Now you must Prepare an image for whiten Teeth in Photoshop.
Check your image and try adding an image with a single person only for better teeth whitening experience. If there is a single person in the image, then we perform the teeth whitening process once. If there are lots of people in an image, then you’ll have to do it multiple times by performing every step on each person separately. In that way you are adjusting the person’s teeth, which will affect the other in the original photo.
Check the subject’s teeth by zooming in photoshop with the keyboard shortcut by holding CTRL and pressing + or – to adjust the zoom level. On macOS hold the CMD key and press + or -.
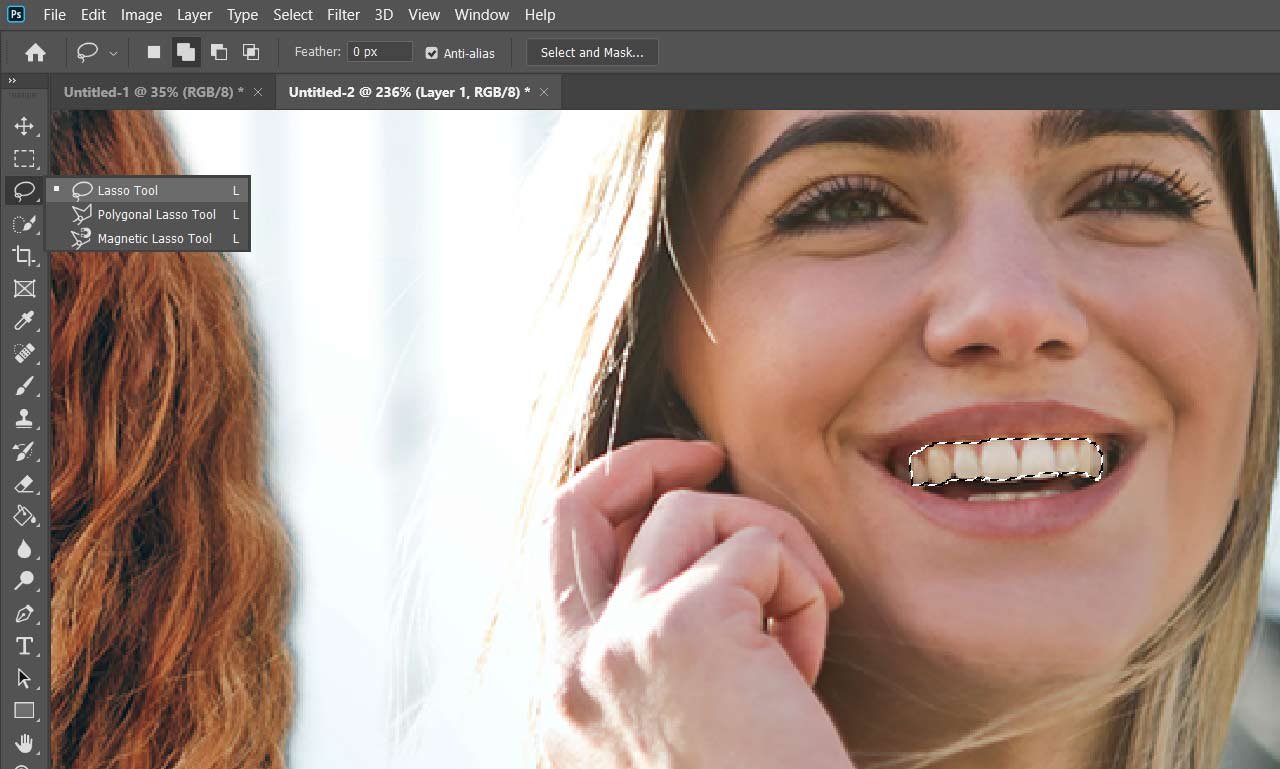
3. Use Lasso Tool to Draw a selection to Whiten Teeth in Photoshop
To do that select lasso Tool in the Toolbar. Select the subject’s teeth. You must select precisely to select teeth. If you are not able to select teeth perfectly, just select them roughly. Don’t worry we can adjust it later.
4. Now Create a new Adjustment Layer of Hue/Saturation
Go to the layers panel, and click on the New Fill or Adjustment Layer button at bottom of the layers panel. It will show you options for the Adjustment layer, where you can select Hue/Saturation

Now it will show a new adjustment layer named Hue/Saturation, which is located above your image in the layers panel. You can change its name whatever you want, or you can leave it, but if you are working on a multiple person’s teeth then you must change its name according to the person’s details. It will be easy to re-edit or readjustment your photo in an organized way to whiten Teeth in Photoshop.
5. Adjusting the layer option to yellows in Photoshop
To whiten the subject’s Teeth, we going to reduce the yellow part in the teeth. Select the Hue/Saturation, then go to Properties Panel, Click on Master and select Yellows. Now it will only change the yellow portion in our selection.

6. Decrease the Saturation Slider to whiten Teeth in Photoshop
In the yellows section, you will find a Saturation slider, reduce it by sliding left and adjusting it according to your needs. To look natural just reduce it minus 20-30. If you are reducing all the way to the left, then your image gets a fake look. Use it precisely to get the best results.

7. How to check whether whiten teeth looks Good or Bad
After making the changes, you can zoom out and see how the image is looking. You can judge your photo by looking from far away. While zoomed out enable and disable the Hue/Saturation layer in the layers panel to check your adjustments.
If you feel that you have done some mistakes in your edit, just go back and refine your adjustments.
8. Second way to Select Teeth in Photoshop
Now you can select the Teeth with the Quick Selection Tool. You must zoom in on teeth and make a selection with the Quick Selection Tool. You adjust the brush size also.
Check Out our more Photoshop Tutorials.