Speed Ramping is the most crucial part of video editing. It can make or break your video if you haven’t done it properly. So, How to do Speed Ramp in Premiere Pro Properly. Speed Ramping is the process of changing the speed of your video clip over time.
Here in this article, I will show you how you can create beautiful speed ramp videos in Premiere Pro. You just have to take the right kind of footage, which will look better when you are changing speed. This tool can do wonders in your video clip.
You have seen a lot of Instagram or YouTube videos, where videos go fast sometime then suddenly it gets slow down smoothly. They are using speed ramp techniques. But you need to know some points before getting into speed Ramping.
How to do Speed Ramp in Premiere Pro Summary
- 1: Creating a Simple Speed Ramp in Premiere Pro
- 2: You have to Understand Frame Rates while working with speed
- 3. Most Advance Speed Ramping Technique
1: Creating a Simple Speed Ramp in Premiere Pro
So, Guys, let’s start with creating a simple speed ramp in Premiere Pro. Add your Clip to the timeline or you can add a video from YouTube by downloading it.
After adding the video, you just have to drag and increase the height of the video track in the timeline. This will show you the speed ramp line in the next steps.
Before editing makes sure your video is on an empty video track because when you slow down it will increase its size and maybe it can overwrite another clip. So, make sure to have a blank video track.
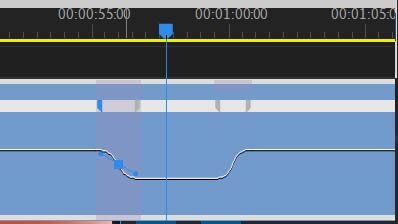
Now Right Click on the Fx button on the expanded clip and choose Time Remapping Then Speed. By default, it has been set on Opacity, now it will on Speed. It will show you a rubber band across your clip now it represents the speed of the clip.

When you drag this band up or down it will change the speed of your clip. If you want to slow down your clip just drag down a little bit to 60-70%. It will slow down your clip. You have to experiment by practicing it.
While using the speed ramp, you need to add some keyframes. To add keyframes CTRL + Click (Windows) or CMD + Click (macOS) on the rubber band. Your keyframes will be added.
Now you can manipulate the keyframes in both timelines and in the Effect Controls panel.
After adding keyframes make sure you have added two keyframes, one for the start of your speed ramp, and the second is to the end of your speed ramp. Your clip will be divided into three parts.

Now you will notice an abrupt speed change in your clip, it’s not smooth and this effect looks like a cut, not a ramp. Click and drag each keyframe to split them, it will create a gradual speed change.
If you want to change the position of the entire keyframe just do Alt + drag or Option + drag the keyframe to another location. You have to experiment with different length speed ramps and do it until you feel satisfied with the edit.
2: You have to Understand Frame Rates while working with speed
When you are working with a speed ramp, it’s very important to understand the frame rates. Normally videos have been shot at 24 or 30fps. If you want to create slow motion from 24 or 30fps footage, your slow motion video will look choppy and not look better.
You have to use a higher frame rate video for slow motion at least 60fps or if you want amazing results you can go with 120fps, because when you slow down 60fps footage it will not get choppy as 24 or 30fps footage. You can slow it down by 50%, it will look still smooth at 50%.
Premiere Pro does its best to add some artificial slow motion on 24 or 30fps, but you will end up with choppy footage. So you have to record in slow motion mode in your camera or select high frame rate to use Speed Ramp in Premiere Pro.
3. Most Advance Speed Ramping Technique
1. Using the Keyframe Interpolation Method
The Speed Ramp has a keyframe that marks from the start and end point for speed change, but here are a couple of ways where Premiere Pro can get the footage point A to point B.
When you use keyframe interpolation, it’s the process of filling the values inside those points. The Linear Interpolation where you will drag and split the keyframe can create a similar speed increase between keyframes.
If you want a smoother and more natural speed ramp, just use the Bezier Interpolation instead. By using the Bezier Interpolation, the speed rate will also accelerate, which creates more of a ramp feeling.
Just Select the keyframe and click and drag the Bezier handles to create an S-curve shape. You can adjust it until it makes you happy.

2. Speed Ramping Transition
The speed ramp transitions are very easy and you can make visually interesting videos. This effect will run consistently in the clip to the end, then into a cut to make a transition.
In the second clip, the speed will start fast and ramps down to make a smoother transition. It can be shown on the passage of time, human jump can also slow down.
You can also watch our other Premiere Pro Tutorials Here.
