What is DaVinci Resolve & How to Apply LUTs in DaVinci Resolve 18?
DaVinci Resolve is one of the best video editing software in the market. If you are a beginner, then the free version of DaVinci Resolve is best for you. You can upgrade after mastering the basic version. When you look at its price point it will also provide you with good value for money.
DaVinci is developed by Blackmagic Design. Which is one of the best camera companies. They are providing constant updates to DaVinci and making it the best software for video editing. You can trust Blackmagic for its amazing hardware quality and for providing valuable software like DaVinci Resolve.
What is RAW Workflow?
If you are using a Blackmagic camera, then DaVinci Resolve can blow your mind. It can handle footage so smoothly than any other video editing software on the same specification PC. Blackmagic has released its own RAW format, which can work in DaVinci Resolve smoothly.
Does DaVinci Run Faster than Other Video Editing Software?
DaVinci Resolve is much faster than other video Editing Software. It can play scrub footage so smoothly than others. It can also render faster than other software.
Color Grading in DaVinci Resolve
If you are using DaVinci Resolve, then you must hear about the Color Grading capabilities in DaVinci Resolve. DaVinci can make our boring-looking footage into an amazing video with color grading only. It has the most powerful color grading program as of now, which is used in multiple Hollywood movies. The Node-based tools are the best industry standard that DaVinci is Providing.
See more of our DaVinci Resolve tutorials.

Important Guidelines Before Using LUTs in DaVinci Resolve
- Make sure your exposure is correct before applying LUTs in DaVinci Resolve. You can check histogram to control the exposure of your footage.
- Check the white balance is correct before applying LUTs in DaVinci Resolve. This will make or break your video, as it will change the look of the LUT. Then you might have to adjust the intensity of LUT.
- Make sure to check the lighting, location, and weather before shooting the video. It can drastically affect the LUT looks. You must understand the LUTs profile where some LUTs will work better in different situations. You have to keep experimenting to get what look you want.
- After applying LUTs, maybe your footage needs adjustments to get desired results, like increasing saturation, decreasing exposure, etc. which depends on your desired look.
How to add LUTs in DaVinci Resolve
We are going to provide you with two steps to add LUTs in DaVinci Resolve. First, we have to install the LUTs in DaVinci Resolve by copying and pasting. Then we will apply the LUT in step 2.
Step 1: How to install LUTs in DaVinci Resolve 17
1. Before applying LUTs in DaVinci Resolve, First open DaVinci Resolve then open or create a new project and add your footage.
2. Go to Media Pool, right click and click on import media. Select the footage which you want to edit.
3. Go to the Color tab, then click on the setting icon at the bottom right corner, click on Color Management, scroll down and find Lookup Tables. Then click on Open LUT Folder.
4. A new window will be where DaVinci Resolve has saved the Default LUTs, you have to copy your LUTs into this folder. Make sure to unzip your LUTs before copying.
5. Now close the folder. In DaVinci we are in the Color Management tab, now click Update Lists and click Save.
Check out the Top 6 DaVinci Resolve Plugins.
Step 2: How to Apply LUTs in DaVinci Resolve after installation
1. Go to the Color tab.
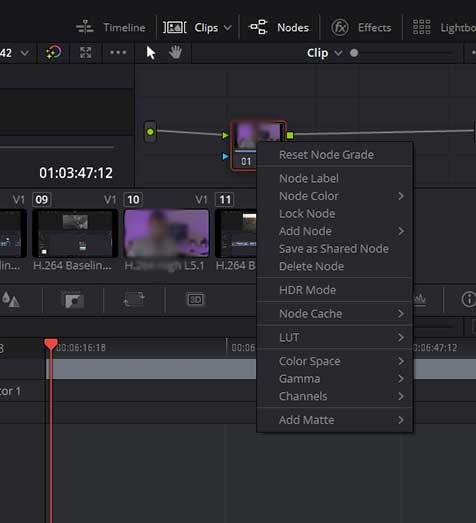
2. You will see the node on the top right side, where you will see a small image of your footage. Right-click on a node and scroll down to LUT and choose your LUT.
3. After selecting the LUT, it will be applied to your current footage.

Here you can watch our other Article for Editing Green Screen in DaVinci Resolve.
