If you are a video editor and using After Effects, then you must be searched for how to Group layers in After Effects. Adobe After Effects is a motion graphics-making beast. Which is the industry standard in filmmaking. What you see these days on Netflix or any other OTT platform 90% of the content is made by After Effects. No matter what they have added they have used After Effects at least once in their programs.
How to Group Layers in After Effects
Well, if you are using After Effects, then you know how to group layers in After Effects is a little bit difficult. Adobe After Effects is a pre-composting software, where users can make multiple video and audio footage and blend them to make amazing clips. To make interesting clips we are adding graphic images and objects. To show you how to group layers in After Effects we must add multiple layers inside After Effects. After that, we can make a group of them or blend them into one file.
Step 1:
Now first Create a new project, go to the top left corner then click on a file then new, and create a new project.

Step 2:
You can either click on new composition on the screen or if it doesn’t show right click on the project panel and select New Composition.

Step 3:
You will see a new dialog box where you can adjust composition settings. You can also adjust the width and height in pixels, also you can change the Pixel aspect ratio, Frame rate, Resolution, Start Timecode, Duration, and Background Color.

Then press OK to make changes in composition.
Step 4:
It’s time to import files that we need to edit in our composition. Right-click on the project panel then Import then File. Browse the file location and select and import them into the project panel.

Step 5:
After importing the file, Now add it to your composition, just drag the file into the composition folder. It will be added to the project, and it will also show in the timeline with the composition window.

Step 6:
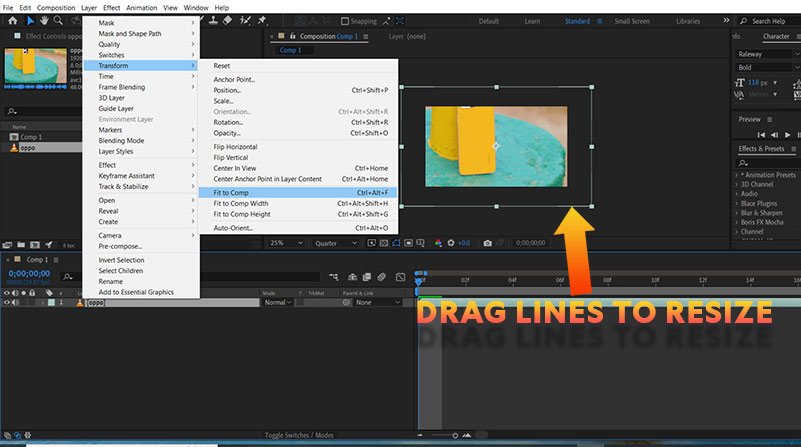
As you can see the footage is 1080p and I have made 720p composition, now I’m going to resize the footage. You can resize the footage with two methods. One just drag the crop lines on the preview window which is out of the preview window, drag to fit on screen or you can right-click on the video layer and then go to Transform > Fit to Comp, the keyboard short is CTRL+ ALT + F. this will resize your footage to the Composition size.

Step 7:
Now Add some more clips, and images or you can use shapes to create some more layers.
Step 8:
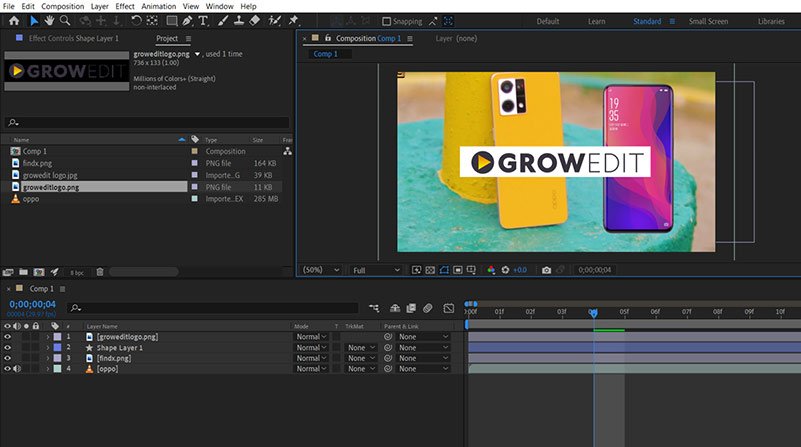
I have added one shape, one logo, and one image phone PNG file. You also add audio files inside the composition.

Step 9:
Now let’s see how to group layers in After Effects. You have to select all layers by clicking on every layer by holding the CTRL key.

Step 10:
Go to layer on the top bar and select Pre Compose. The keyboard shortcut is CTRL + SHIFT + C.

Step 11:
A new window will pop up and name the new composition where all your selected layers will come with your required details. I’m just making it by the default name.

It will be named Pre-comp 1 and only shows this layer in the timeline. Now you have learned how to group layers in After Effects.
Conclusion – How to Group Layers in After Effects
Earlier in this article, we have shown the full process to group layers in After Effects. You can also make animation using video and audio clips with frame speed control. With that, you can synchronize video and audio clips to make awesome content. Adobe After Effects supports lots of audio and video formats. This will help you to save time and change the format of the files.
Recommended Articles of Grow Edit
Here on this website, we have added lots of After Effects Tutorials, Premiere Pro Tutorials, DaVinci Resolve Tutorials, and Adobe Illustrator Tutorials – you can check some of the Tutorials below –
